> ## Documentation Index
> Fetch the complete documentation index at: https://partner-integrations.voyado.com/llms.txt
> Use this file to discover all available pages before exploring further.
# Integrating your POS
Here you'll learn how to integrate your Point-of-Sale (POS) system with Voyado Engage.
In this article we will cover how to:
* Connect to the Engage API
* Sync and manage customer data
* Handle transactions
* Deliver digital receipts
* Set up personalized promotions and vouchers
* Migrate existing data
In Engage, customers are called **contacts**. This includes members, subscribers and prospects.
## 1. Basic requirements
To start building an integration with Engage, here's what you need:
* **Base URL** - Your Engage environment endpoint
* **API Key** - Your authentication key generated in Engage
* **Source** - A string identifying the system or integration sending the data (such as “ECOM”)
* **StoreExternalId** - A unique identifier per store, site, or market
The `storeExternalId` attribute is a unique string for each store and it should always reflect the store location, such as for example "store03-stockholm" or "online\_store\_finland".
## 2. Handling customers
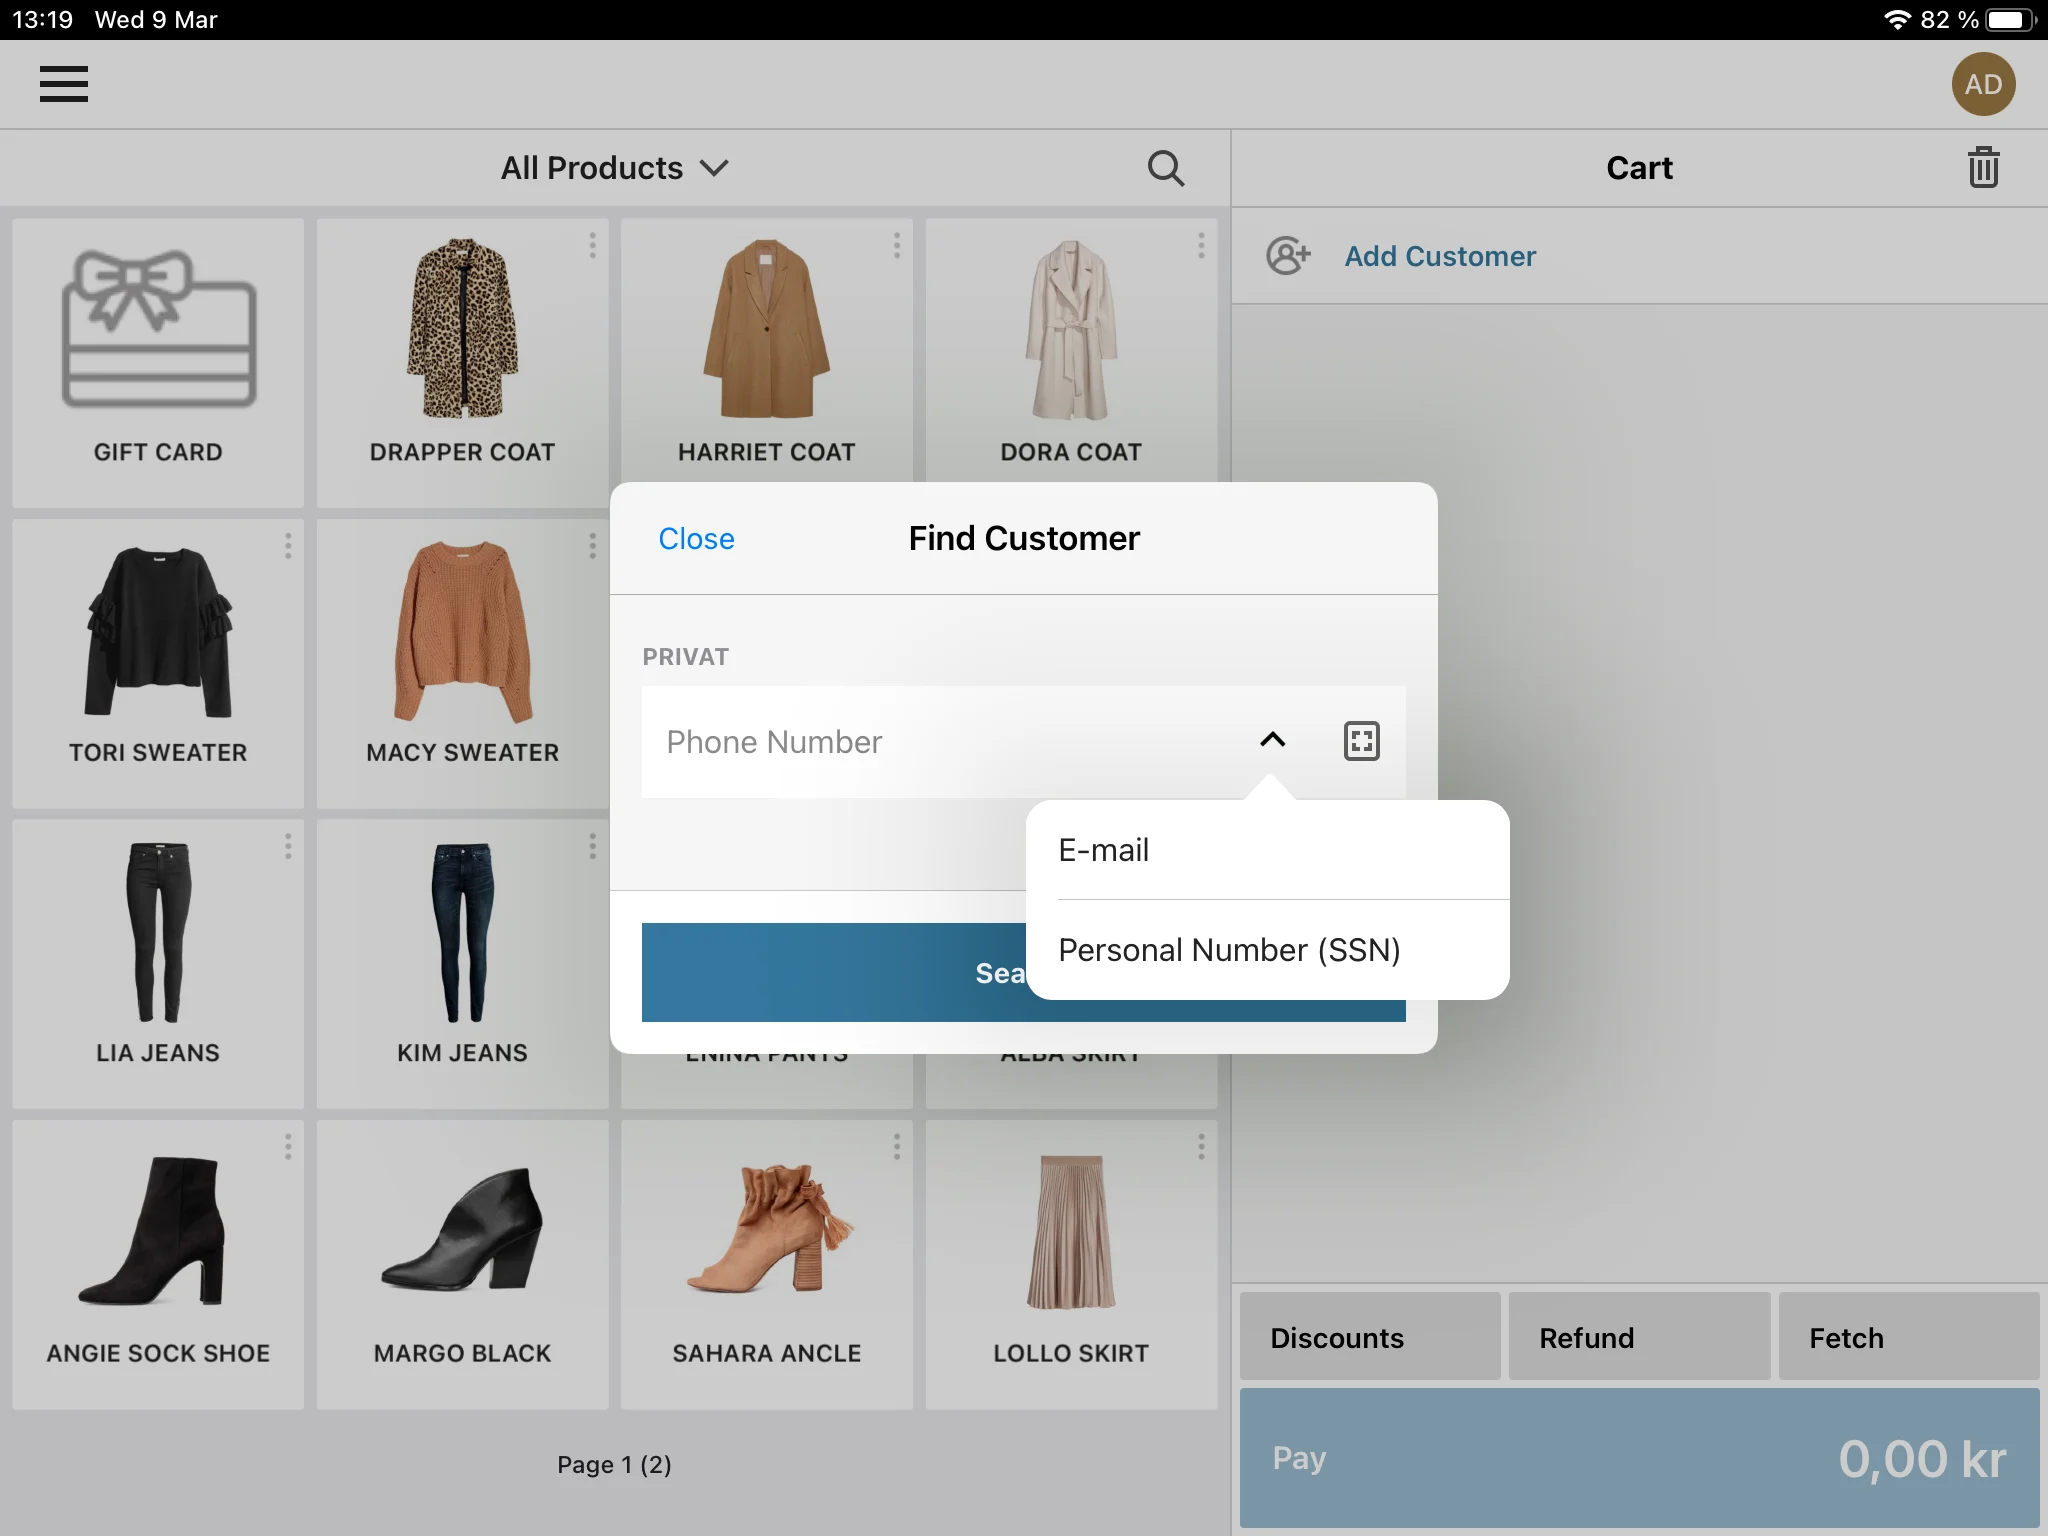
The flow begins with identifying the customer.
### 2.1 Identifying a customer
FIrst check if the customer already exists in Engage. The default unique identifier for contacts in Engage is **email** but other options exist:
* Mobile phone number
* Member number
* Personal identify number
 ### 2.2 Registering a customer
If no match is found, you will need to create a new Engage contact for the customer. To keep it fast and easy at checkout, build your integration so that only one identifier (email or phone) is required from the customer to add them.
Registering a new contact will starts Engage's automation workflows (if one is set up).
### 2.3 Data to include
When posting a contact's data to Engage, always include the following in your payload:
* **Source**: For example "ECOM"
* **StoreExternalId**: Reflects the customer's market/shipping country
* **Country**: Set from address, site geo-location, or store settings
* **Language**: Based on site language or customer choice (ISO 639-1)
### 2.4 Displaying customer info
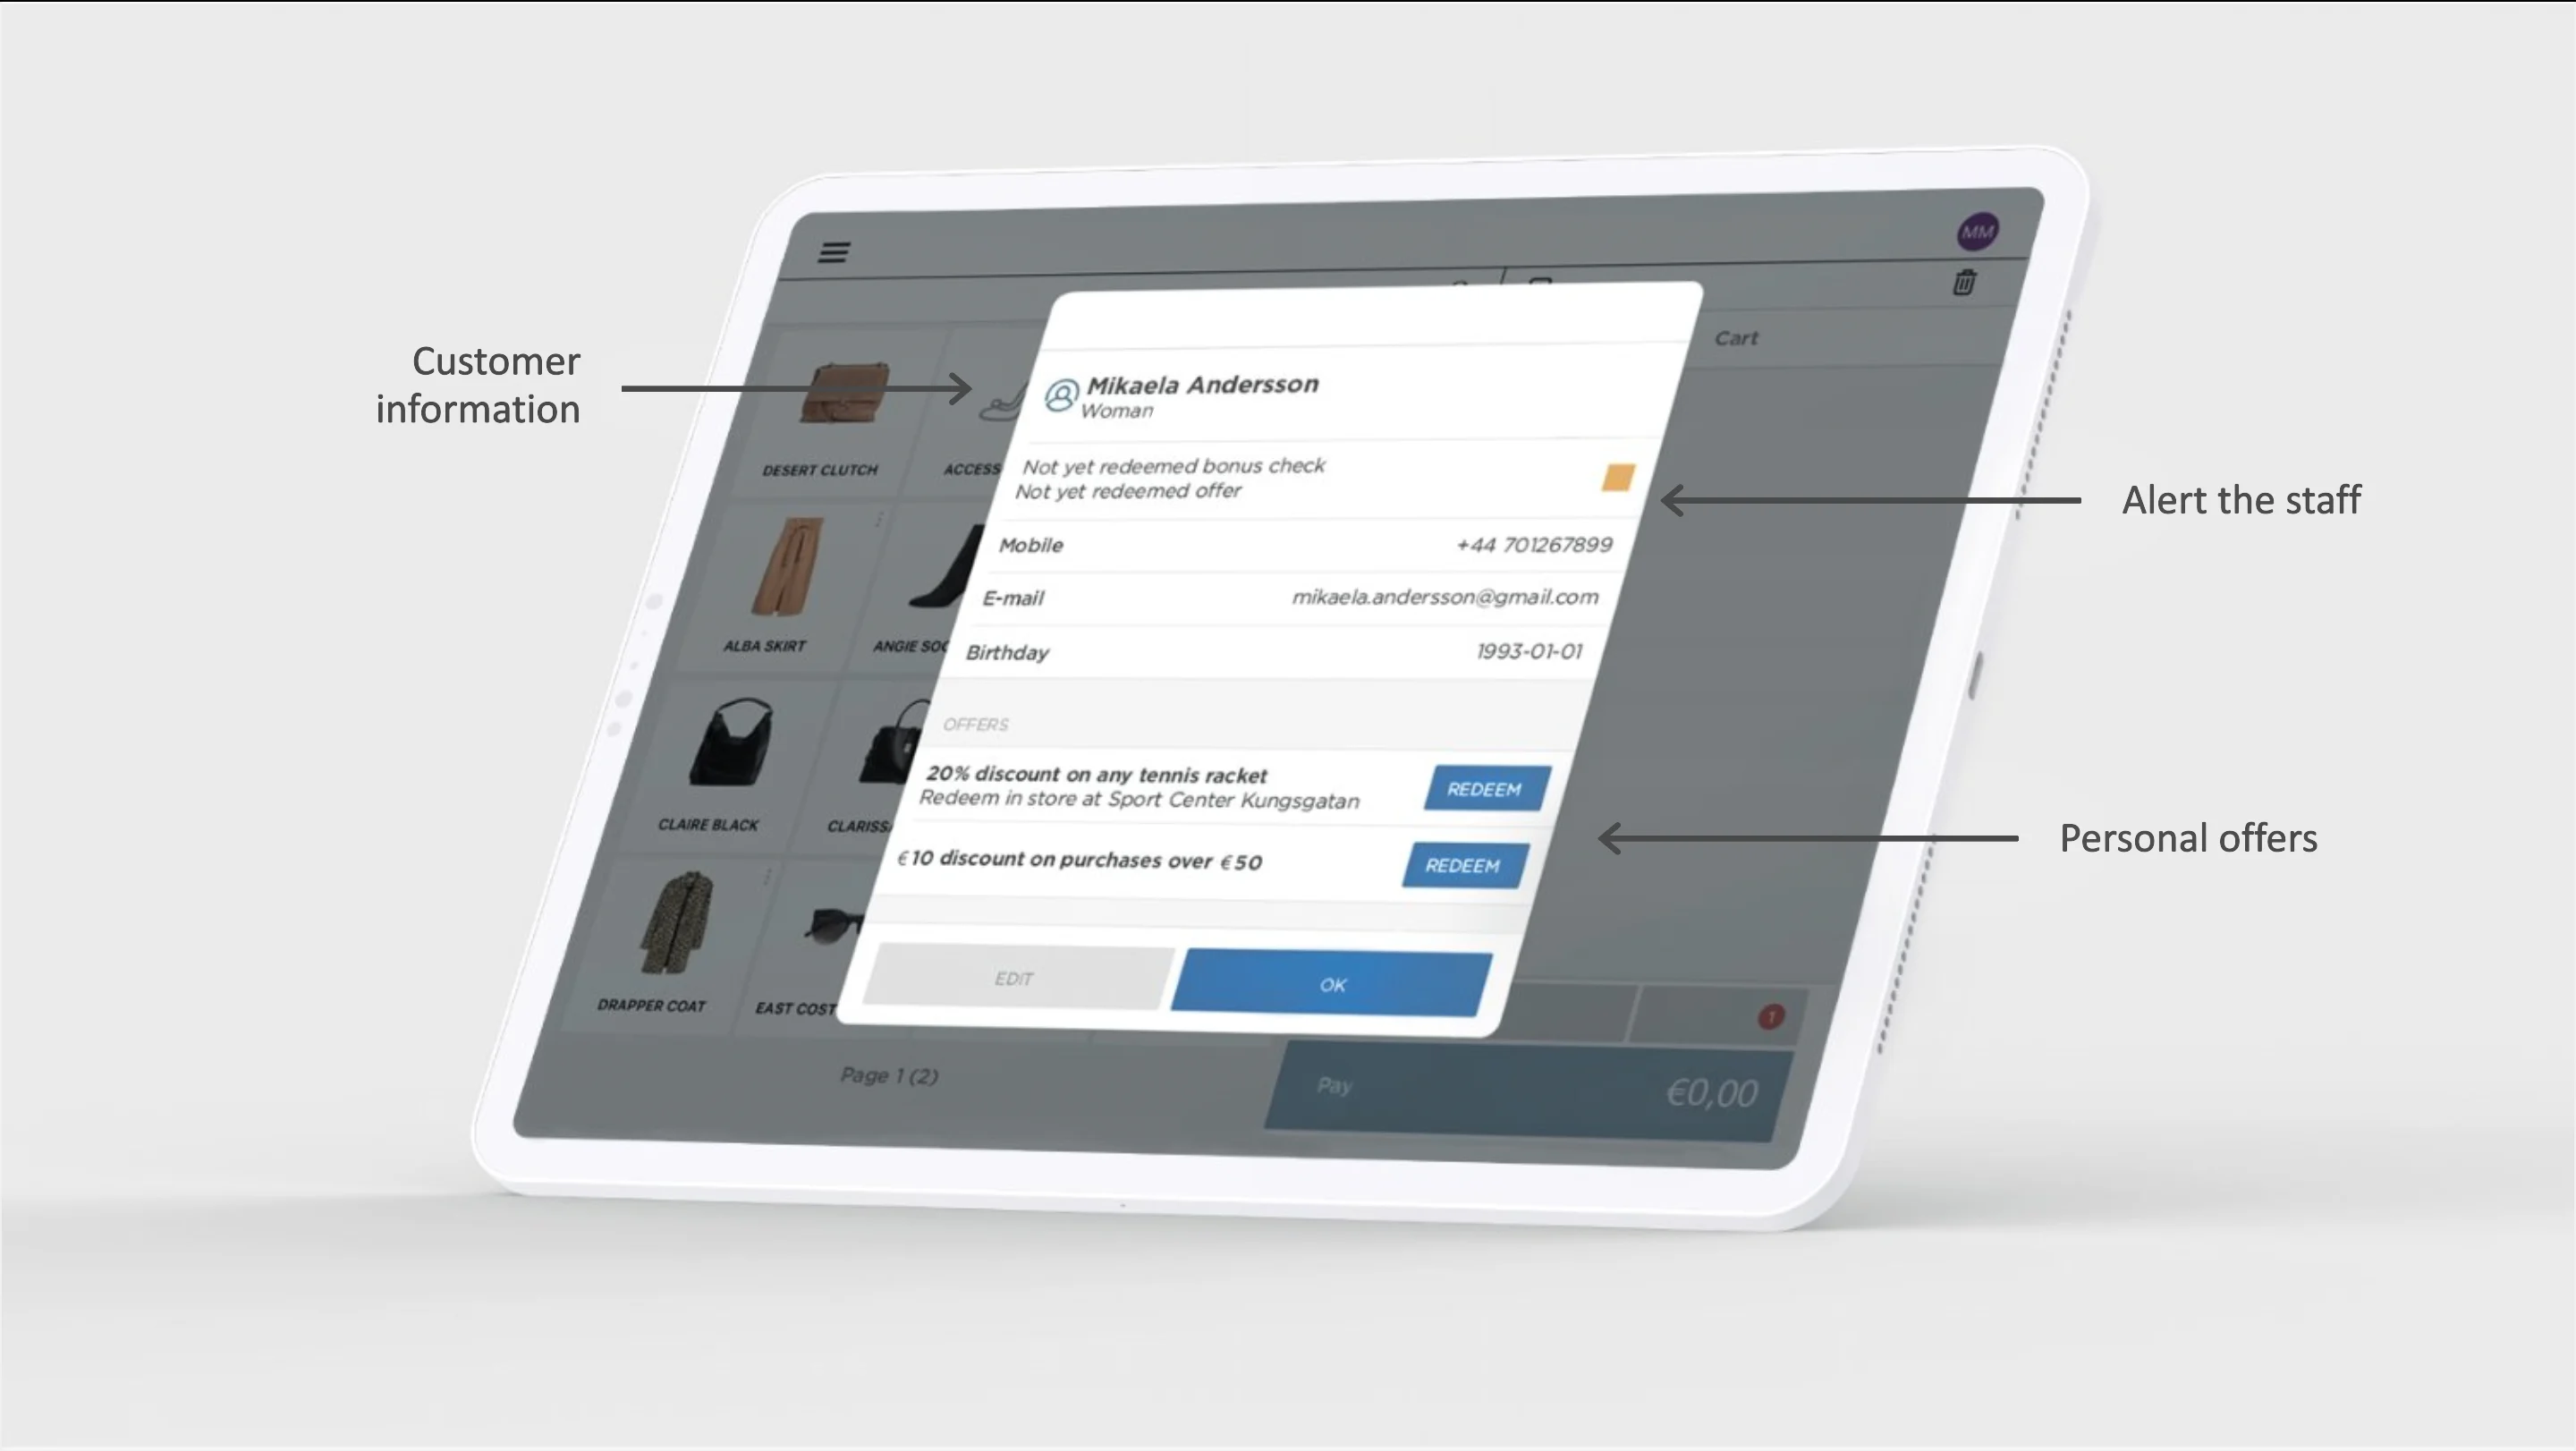
The Engage `/contactoverview` endpoint can be used fetch the customer's full data profile (known as their enriched profile).
Here are some useful data points from the enriched profile:
* First name
* Last name
* Address
* Gender
* Birthday
* Communication preferences
* Loyalty level
* Points
* Available vouchers
* Available promotions
* Consents
Use this to display relevant loyalty data on “My Pages” and in checkout:
### 2.2 Registering a customer
If no match is found, you will need to create a new Engage contact for the customer. To keep it fast and easy at checkout, build your integration so that only one identifier (email or phone) is required from the customer to add them.
Registering a new contact will starts Engage's automation workflows (if one is set up).
### 2.3 Data to include
When posting a contact's data to Engage, always include the following in your payload:
* **Source**: For example "ECOM"
* **StoreExternalId**: Reflects the customer's market/shipping country
* **Country**: Set from address, site geo-location, or store settings
* **Language**: Based on site language or customer choice (ISO 639-1)
### 2.4 Displaying customer info
The Engage `/contactoverview` endpoint can be used fetch the customer's full data profile (known as their enriched profile).
Here are some useful data points from the enriched profile:
* First name
* Last name
* Address
* Gender
* Birthday
* Communication preferences
* Loyalty level
* Points
* Available vouchers
* Available promotions
* Consents
Use this to display relevant loyalty data on “My Pages” and in checkout:
 ### 2.5 Update customer profile
When a customer updates their data (for example name or address or marketing preferences), you'll need to push that update to Engage.
Only include the fields you want to change in your update payload. Empty values will in the update payload will overwrite the existing data that is stored in Engage.
## 3. Working with receipts
Engage uses receipts (the total data of a customer's transactions) to track purchases and power customer segmentation, enabling personalized experiences and analytics.
### 3.1 Registering purchases
Send each completed receipt from your POS to Engage.
Be sure to include any discounts, vouchers and promotions and:
* Spread the discount value across all item lines
* Include `promotionId` or `voucherNumber` if applicable
### 3.2 Local currency support
If your POS operates in a different currency than the customer's group currency, include a currency conversion in your payload (as the attribute `exchangeRateToGroupCurrency`).
If your POS is unable to include a currency conversion rate in the transaction. then a conversion scheme to handle this can be set up in Engage.
A currency code must always be included in the transaction.
### 3.3 Registering returns
When a return is made, you must send a return receipt containing the details of the returned products.
### 3.4 Sending digital receipts post-purchase
You can send digital receipts post-purchase from Engage, which include:
* Customer details
* Order and item information
This is done through the `/orders` endpoints:
When the state of orders change, marketing automation flows in Engage can be triggered:
Custom data can be included in the order via `data` or on then item level using `item.ExtraData`.
## 4. Personalized promotions in POS
You can use Engage's segmentation and automation tools to assign individual promotions or vouchers, such as “10% off for Gold members” or “€10 Voucher“. Some important points about promotions (and vouchers):
* Promotions are created in Engage and referenced in the e-com by an external ID
* It is the e-com that handles pricing rules and redemption logic
* It is Engage that handles personal assignments of the discount
### 4.1 Welcome promotion at sign-up
If your loyalty program offers welcome promotions, customers often expect to receive and redeem such a promotion immediately, especially during an in-store purchase. To enable this, you can directly assign a personal promotion in Engage using the request:
```http theme={null}
POST /api/v3/promotion-assignments
```
By doing this you can:
* Avoid delays caused by asynchronous automation flows
* Prevent queue build-up and customer frustration in physical stores.
* Ensure the promotion can be redeemed during the same transaction where the customer signs up
### 4.2 Creating promotion in POS
Create the promotion in the POS system first. For example:
* Promotion name: Welcome 10%
* Discount logic: 10% off first purchase
* Promotion code: WELCOME10
This promotion will be responsible for price handling at checkout.
### 4.3 Creating promotion in Engage
Now create a corresponding promotion in Engage for the welcome offer. This promotions references the POS promotion you just made through its external promotion code (`externalId`) which must match the POS promotion code / internal ID if the POS owns the price logic.
What Engage does here is:
* Controls the assignment
* Controls the validity period
* Connects the promotion to the contact
* Makes it available on the customer's profile
### 4.4 In-store sign-up flow
Here is how the promotion is handles in the sign-up flow.
* Customer registers as a loyalty member in the POS
* POS either updates the customer in Engage or creates them there
Immediately after successful sign-up, the POS must call:
```http theme={null}
POST /api/v3/promotion-assignments
```
With:
* The customer identifier (`contactId`)
* The promotion identifier (`promotionId`)
This makes the promotion personal and instantly available.
Immediately after successful purchase, the POS must call:
```http theme={null}
POST /api/v3/promotion-assignments/[assigmentId]/redeem
```
With:
* The promotion assignment identifier (`assigmentId`)
* The redemption channel as "POS" ("redemptionChannel" : "POS")
## 5. Assigning vouchers
Points are converted to vouchers in Engage and created as a personally assigned monetary discount in the POS.
Engage handles the pricing rules and the POS then redeems the voucher using the Engage API.
## 6. Data migration (before go-live)
Before going live, you must migrate into Engage your:
* Historical customer data
* Historical transaction data
You can choose what to sync and and how far back to sync it.
Voyado recommendeds you go back a maximum of 24 months for receipts (transactions).
### 2.5 Update customer profile
When a customer updates their data (for example name or address or marketing preferences), you'll need to push that update to Engage.
Only include the fields you want to change in your update payload. Empty values will in the update payload will overwrite the existing data that is stored in Engage.
## 3. Working with receipts
Engage uses receipts (the total data of a customer's transactions) to track purchases and power customer segmentation, enabling personalized experiences and analytics.
### 3.1 Registering purchases
Send each completed receipt from your POS to Engage.
Be sure to include any discounts, vouchers and promotions and:
* Spread the discount value across all item lines
* Include `promotionId` or `voucherNumber` if applicable
### 3.2 Local currency support
If your POS operates in a different currency than the customer's group currency, include a currency conversion in your payload (as the attribute `exchangeRateToGroupCurrency`).
If your POS is unable to include a currency conversion rate in the transaction. then a conversion scheme to handle this can be set up in Engage.
A currency code must always be included in the transaction.
### 3.3 Registering returns
When a return is made, you must send a return receipt containing the details of the returned products.
### 3.4 Sending digital receipts post-purchase
You can send digital receipts post-purchase from Engage, which include:
* Customer details
* Order and item information
This is done through the `/orders` endpoints:
When the state of orders change, marketing automation flows in Engage can be triggered:
Custom data can be included in the order via `data` or on then item level using `item.ExtraData`.
## 4. Personalized promotions in POS
You can use Engage's segmentation and automation tools to assign individual promotions or vouchers, such as “10% off for Gold members” or “€10 Voucher“. Some important points about promotions (and vouchers):
* Promotions are created in Engage and referenced in the e-com by an external ID
* It is the e-com that handles pricing rules and redemption logic
* It is Engage that handles personal assignments of the discount
### 4.1 Welcome promotion at sign-up
If your loyalty program offers welcome promotions, customers often expect to receive and redeem such a promotion immediately, especially during an in-store purchase. To enable this, you can directly assign a personal promotion in Engage using the request:
```http theme={null}
POST /api/v3/promotion-assignments
```
By doing this you can:
* Avoid delays caused by asynchronous automation flows
* Prevent queue build-up and customer frustration in physical stores.
* Ensure the promotion can be redeemed during the same transaction where the customer signs up
### 4.2 Creating promotion in POS
Create the promotion in the POS system first. For example:
* Promotion name: Welcome 10%
* Discount logic: 10% off first purchase
* Promotion code: WELCOME10
This promotion will be responsible for price handling at checkout.
### 4.3 Creating promotion in Engage
Now create a corresponding promotion in Engage for the welcome offer. This promotions references the POS promotion you just made through its external promotion code (`externalId`) which must match the POS promotion code / internal ID if the POS owns the price logic.
What Engage does here is:
* Controls the assignment
* Controls the validity period
* Connects the promotion to the contact
* Makes it available on the customer's profile
### 4.4 In-store sign-up flow
Here is how the promotion is handles in the sign-up flow.
* Customer registers as a loyalty member in the POS
* POS either updates the customer in Engage or creates them there
Immediately after successful sign-up, the POS must call:
```http theme={null}
POST /api/v3/promotion-assignments
```
With:
* The customer identifier (`contactId`)
* The promotion identifier (`promotionId`)
This makes the promotion personal and instantly available.
Immediately after successful purchase, the POS must call:
```http theme={null}
POST /api/v3/promotion-assignments/[assigmentId]/redeem
```
With:
* The promotion assignment identifier (`assigmentId`)
* The redemption channel as "POS" ("redemptionChannel" : "POS")
## 5. Assigning vouchers
Points are converted to vouchers in Engage and created as a personally assigned monetary discount in the POS.
Engage handles the pricing rules and the POS then redeems the voucher using the Engage API.
## 6. Data migration (before go-live)
Before going live, you must migrate into Engage your:
* Historical customer data
* Historical transaction data
You can choose what to sync and and how far back to sync it.
Voyado recommendeds you go back a maximum of 24 months for receipts (transactions).