Enabling the extension
In Adobe Commerce admin, navigate to Stores > Configuration > Integrations and select the “Voyado” tab. Inside this configuration space, you’ll be able to enable or disable the functionality supported by the extension. Start by enabling the extension under “General” settings as seen in this video:Websites
You can connect your Voyado Engage environment/s to all your websites. In the top left corner, change the website under “Scope”. You can choose to have a default setup for all websites, connected to one Voyado Engage environment (recommended), or configure websites separately, connecting each one to a separate instance.Establish your connection settings
Next, you’ll need to input the credentials for your Engage environment. Base URL: Input the Base URL of your Engage environmentExample of a base URL
Example of an Engage API key
Configure the contact sync
This integration with Engage supports the sync of customers, guests and newsletter subscribers. These different types of customers are each stored in Voyado Engage as separate contact types. All contact types must be created in Engage by the Voyado team before contact exports are enabled. To allow syncing of the Customer entity you will have to:- Enable the customer export, found under Export > Enable customer export.
- Go to the “Customer Specific Settings” section and enable “Create Voyado contact as member”.
If you want to sync your guest customers and store them in Engage, follow these steps:
- Enable the customer export which can be found under Export > Enable customer export.
- Go to the “Customer Specific Settings” section and enable Create Voyado contact also from Guest Customer.
If you want to store your newsletter subscriptions in Engage:
- Enable the newsletter subscriber export under Export > Enable newsletter subscriber export.
Sync all contacts to Engage as type “Member”
With this setting you can choose to save ALL contacts - customers, guests and newsletter subscribers - as contact type “Member” in Engage.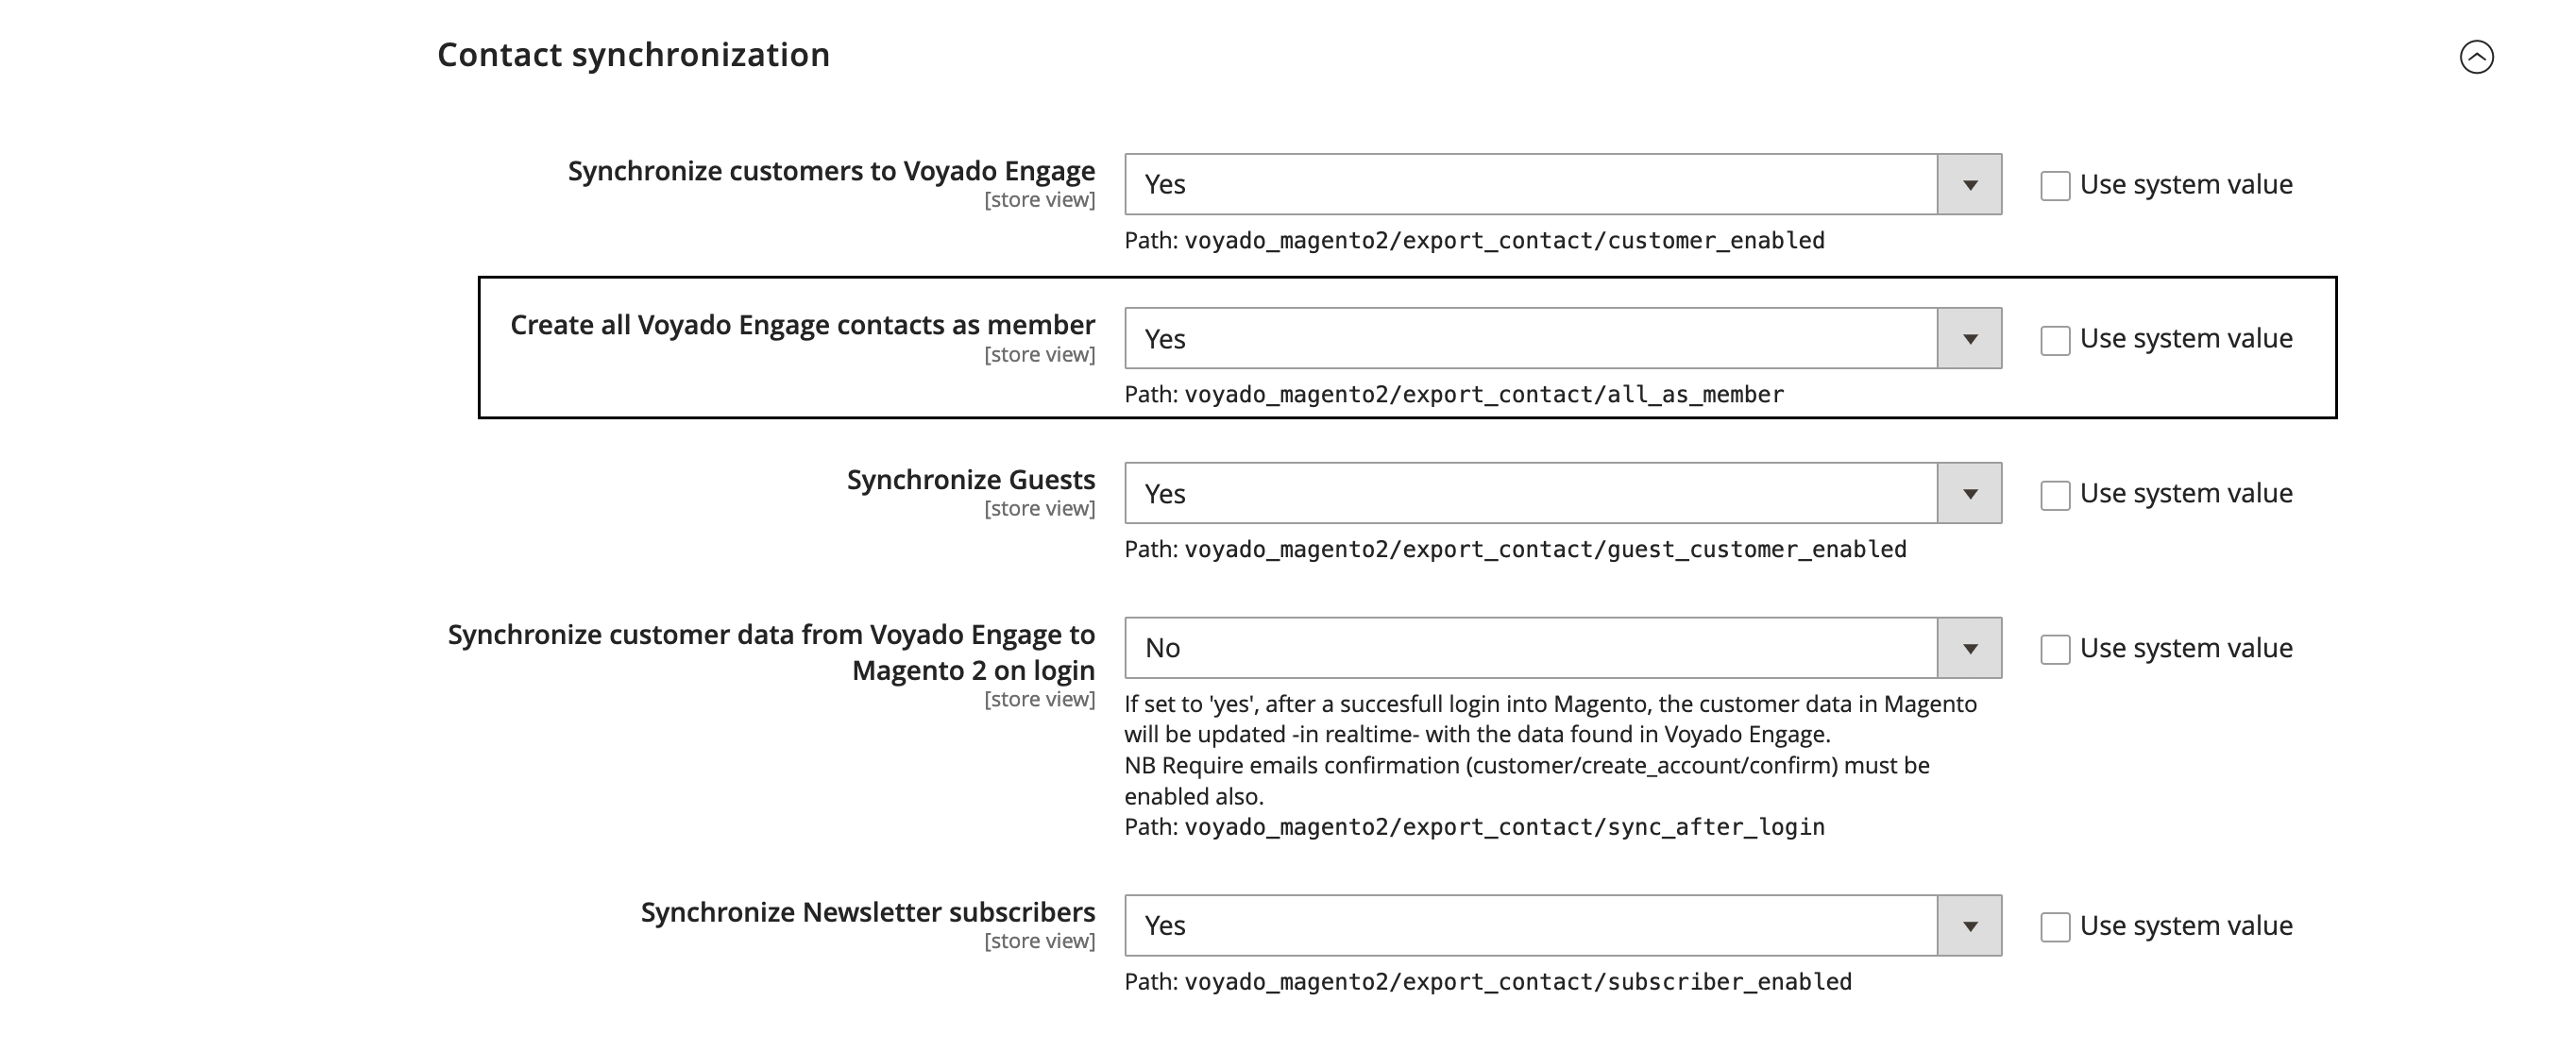
Phone number validation
Voyado Engage requires a phone number to have a country calling code. If no validation for this is done in the front-end, and a phone number without a country calling code is input in checkout, the extension will validate that phone number based on the code of the country chosen in checkout. For example:- A customer chooses country “Sweden” and gives the phone number “0701234567” in checkout.
- The extension validates to check if the number is a valid Swedish number.
- If it is, we add a country calling code and format the number to “+46701234567” before we send it to Engage.
- If not, we just exclude the phone number from the request sent to Engage.
Enable Engage to update customers
In the configuration area you have the option of activating a two-way sync, allowing Engage to update customers in Adobe Commerce. The two-way sync is connected to the login event, meaning that data is fetched from Engage and used to update the customer whenever they login to their account. You can sync any or all of the name and address data or the newsletter subscription flag from Engage. Two-way sync is only applicable if you have the “Require Email Confirmation” setting enabled in Adobe Commerce. This can be found in Stores > Configuration > Customer Configuration. Voyado recommends that you at least enable the “Sync newsletter subscription” setting connected to the two-way sync. This is so that both platforms are in sync and so that there is no mismatch in the newsletter subscription field. Follow these steps to enable to two-way sync:- Enable the “Sync after login” setting which can be found under Customer specific settings > Sync after login.
- Enable “Sync name and address” if you want Engage to update this information in Adobe Commerce.
- Enable “Sync newsletter subscription” if you want Engage to update this information in Adobe Commerce (recommended).
Contact data model
Here are the fields in the contact model: Contact:- First name
- Last name
- Street
- City
- Zip code
- Country code
- Gender
- Recruited in store (the store where the contact signed up)
- Accepts email marketing
Configure syncing of purchases and returns
To sync purchases (known as “invoices” in Adobe Commerce) and returns (“credit memos” in Adobe Commerce) you must enable two separate exports. Activating these will allow you to create segments based on the contact’s order history in Voyado Engage. You can enable the invoice export at Export > Enable invoice export. You can enable the credit memo export at Export > Enable credit memo export.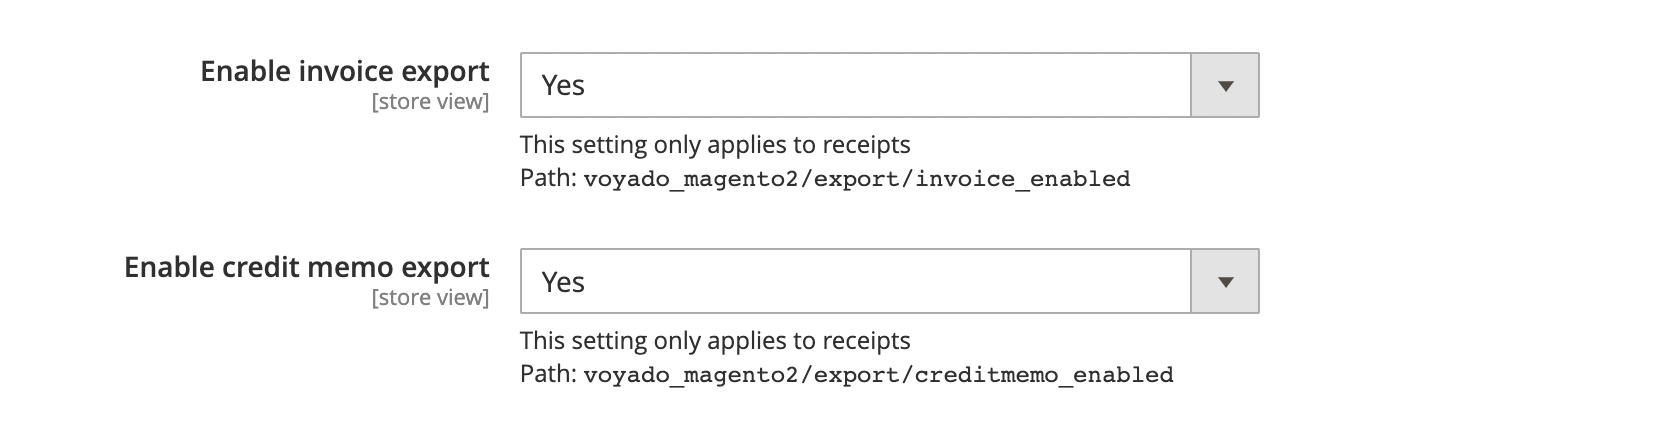
The order will only be stored for segmentation in Engage after it has been set to “invoiced” in Adobe Commerce Admin.
Payload examples
Purchase transaction (booked invoice)
Purchase transaction (booked invoice)
Return transaction (credit memo)
Return transaction (credit memo)
Configure Order Notifications
The Voyado module can automatically notify Voyado Engage when an order reaches a specific status. This is how Engage knows when to trigger post-purchase automations, loyalty point awards, and transactional communications.Enabling order notifications
- Go to Stores → Configuration → Voyado Engage → Order notifications
- Set Enable Order notifications to Yes
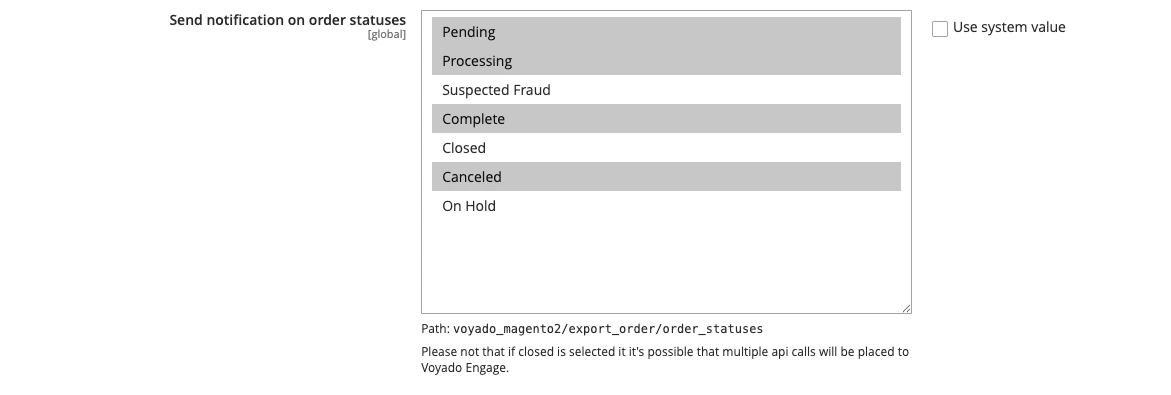
- In Send notification on order statuses, select every status that should trigger a notification to Engage
- Click Save Config
Choosing the right statuses
You can select one or more statuses. A notification is sent to Engage each time an order is saved with one of the selected statuses. Common configurations:| Goal | Status |
|---|---|
| Notify Engage when an order is confirmed | Pending |
| Notify Engage when an order is shipped | Processing |
| Notify Engage when an order is fulfilled | Complete |
| Notify Engage when an order is cancelled | Cancelled |
If you want to trigger “Order returned notifications”, you must enable the credit memo export (see the previous section).
Custom order statuses
Custom order statuses — added by your theme, a third-party module, or your own Magento configuration — are fully supported. They appear in the status list automatically alongside the native Magento statuses. No additional setup or code changes are required to use them. If a custom status such as Packing or Shipped is relevant to your Engage workflows, simply select it in the list and save.Make sure that these custom order statuses are also configured on Voyado Engage side.
Where to manage order statuses in Magento
If you need to create or modify order statuses, go to:Stores → Order Status Any status created there will immediately become available in the Voyado notification settings.
Order data model
Below are the “out of the box” data points included in transactional emails: Contact:- MatchKey (contactId)
- MatchKeyType (GUID)
- Currency
- Created date
- Freight fee
- Freight fee VAT
- Language
- Order number
- Order status
- Payment methods
- Shipping method
- Payment status
- Total discounts
- Total gross price|
- Total VAT
- Total original price
- Total net price
- Total items price|
- Total discounts
- First name
- Last name
- Middle name
- Phone
- Billing city
- Billing country
- Billing company
- Billing street
- Billing zip code
- Shipping first name
- Shipping last name
- Shipping middle name
- Shipping phone
- Shipping city
- Shipping company
- Shipping country
- Shipping street
- Shipping zip code
- Description
- Price
- Quantity
- SKU
- Image URL
- Image target URL
- VAT amount
- VAT percent
- Type (PURCHASE or RETURN)
See the README file
See installation instructions
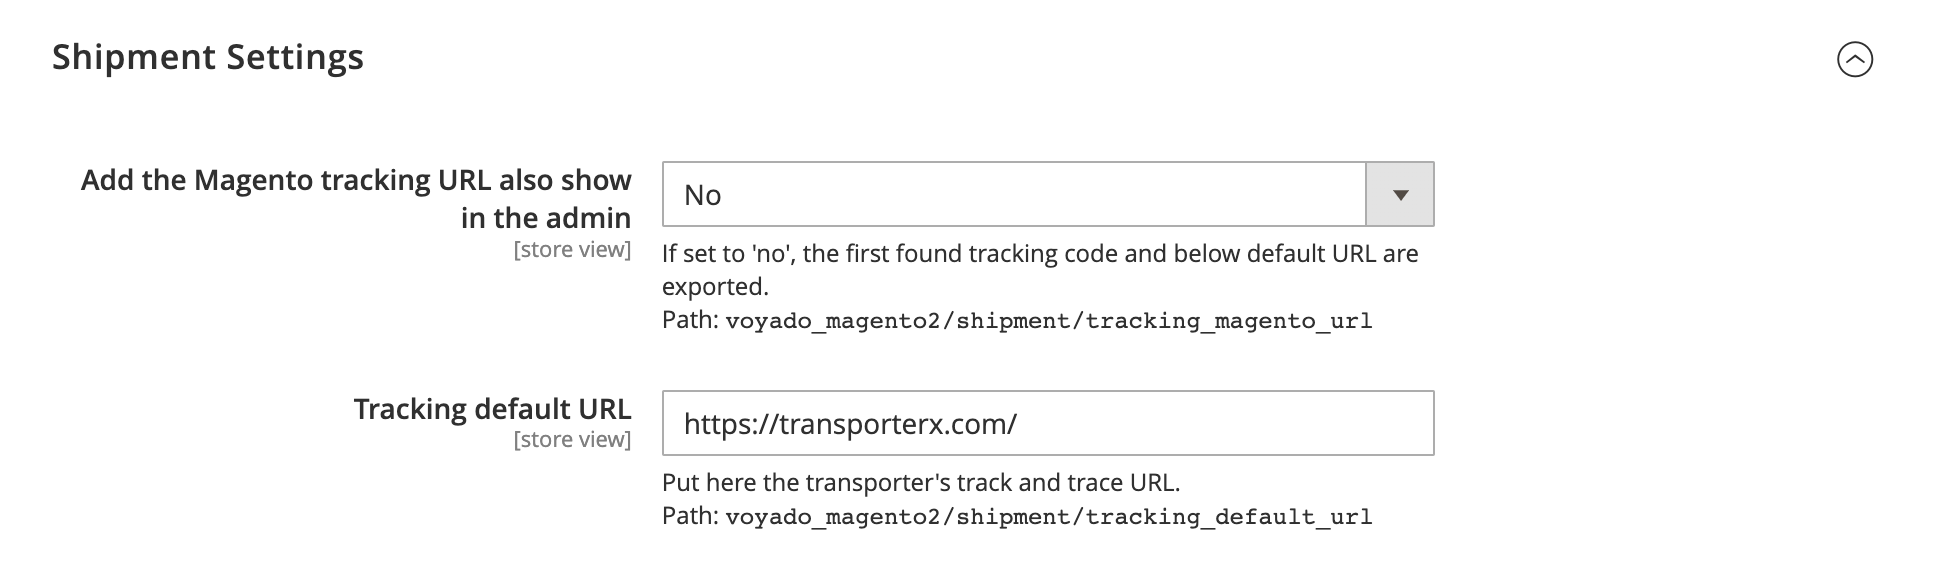
Shipment settings
Add the Adobe Commerce tracking URL at Shipment settings > Add the Adobe Commerce tracking URL also shown in the admin. Setting this to “Yes” will add the default tracking link provided by Adobe Commerce which is available in admin.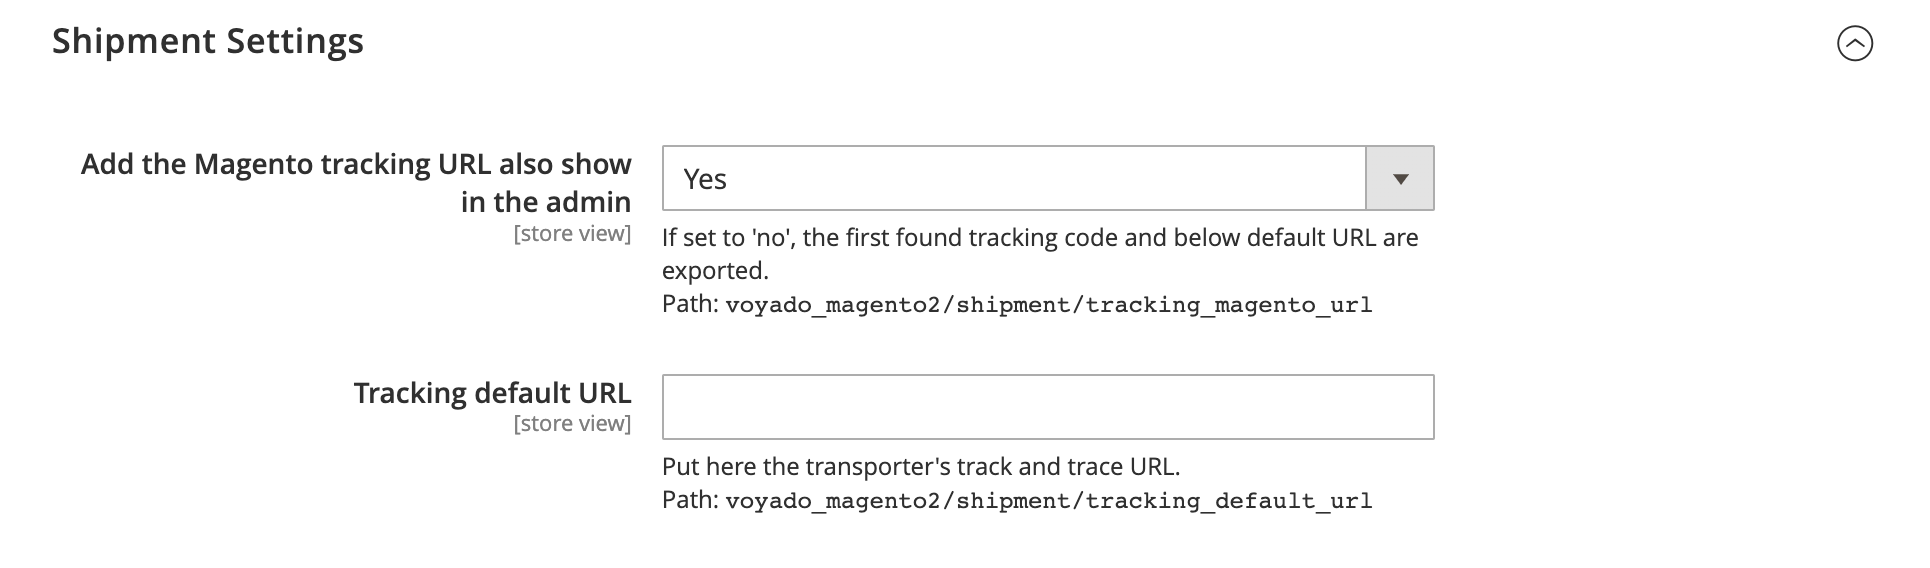
Soft identification
When you send a newsletter or email with a link to your customers in Engage, the links are encrypted with a contact identifier (contactId). This functionality can be used for various actions, such as triggering abandoned carts or product views through Engage’s tracking script, or to personalize the experience on-site since Engage lets Adobe Commerce know who the visitor is. To enable soft identification:- Navigate to Soft Login > Enable and select “Yes”.
- Input your decryption key.
DataLayer Event: softLogin
Once the customer is identified, the extension triggers a softLogin event in the dataLayer. This event contains the customer’s Contact ID under thecontactId property.
Soft identification only facilitates web-activity tracking and personalization on-site. It is not something that is supported out-of-the-box, since it is tightly coupled to front-end components.
Web activity tracking
Enabling this feature in the extension will allow you to act on cart abandonment and abandoned browse (beta). Engage will also calculate and store the ten top products of interest which can be used in segmentation as well as when generating content in emails. Web activity tracking is only applicable if using the Adobe Commerce native front-end. If you are running a headless front-end then you’ll need to implement this yourself. See the following link.Learn about web activity tracking
- Adobe Commerce native front-end
- The Voyado/magento2 project version 4.2.0
- Web activity tracking enabled in Voyado Engage (talk to your Voyado account manager)
Config area
In the Adobe Commerce config area, scroll down to the bottom of the page. Select the “Enable” drop-down and choose the option “Yes”.
Script path
Input the “Script path” which depends on your environment:
Tenant ID
Input the tenant ID of your Voyado Engage environment. This string is your unique client (tenant) ID and is the same in production and staging. It is usually the subdomain name in
*.voyado.comFor example, the tenant ID for “supershop.voyado.com” would be “supershop”. Contact your Voyado team if you are unsure about this.